
Creating a sculptural artwork is a rewarding and intricate process that combines creativity, skill, and an understanding of materials. Whether you’re a beginner or an experienced artist, sculpting offers a way to express your ideas and emotions through three-dimensional forms. In this guide, we will walk you through the essential steps of creating a sculptural artwork, from conceptualization to final touches.
1. Understand the Basics of Sculpture
Before diving into the process, it’s crucial to understand what sculpture is and the different forms it can take. Sculpture is an art form that involves shaping materials into three-dimensional forms. It can be free-standing, such as statues or busts, or relief, where the artwork is attached to a background, like bas-reliefs.
There are several types of sculpture:
Additive sculpture: This involves building up material to create a form, often with clay, wax, or plaster.
Subtractive sculpture: This technique requires the removal of material to reveal the shape, typically used with stone or wood.
Casting: In this method, a material is poured into a mold to create a sculpture.
Assemblage: This involves combining found objects or materials to create a new form.
Understanding these basic methods will help you choose the right approach for your sculpture, depending on the materials and techniques you wish to explore.
2. Develop a Concept or Idea
Every great sculpture starts with an idea. The first step in creating a sculptural artwork is to brainstorm and conceptualize what you want to create. Your idea can stem from a personal experience, an observation of the world around you, or an abstract concept.
Here are some ways to approach this phase:
Inspiration: Look at the work of other artists, nature, human anatomy, or even other art forms like literature or music. Inspiration can come from anywhere.
Sketches: Draw preliminary sketches of your idea. This helps visualize the sculpture and allows you to refine your concept. If your sculpture is figurative (e.g., a person or animal), consider its proportions, posture, and movement.
Theme: Consider the message or emotion you want to convey. Sculpture can evoke feelings such as strength, serenity, or chaos, depending on the theme and style.
At this stage, it’s important to be flexible. Sculpture often evolves as you work, so don’t be afraid to make adjustments to your original concept.
3. Choose Your Materials
Once you have a concept, it’s time to select the material you’ll work with. The choice of material influences the technique, tools, and style of your sculpture. Common materials for sculpting include:
Clay: One of the most versatile materials, ideal for additive sculpture. It’s flexible, easy to manipulate, and can be fired in a kiln to harden.
Wood: A traditional material for subtractive sculpture. Wood can be carved and shaped into intricate designs, but requires careful handling due to its grain and texture.
Stone: Marble, limestone, and other stones are often used in subtractive sculpture. Stone requires specialized tools and is labor-intensive, but the result can be stunningly durable.
Metal: Metals like bronze, aluminum, and steel can be used for casting or welded sculptures. These materials are strong and long-lasting.
Plaster: Used in casting and as a base for some additive sculptures, plaster is easy to work with and can be detailed when dry.
Found Objects: Some artists use found objects, such as scrap metal, wood, and everyday items, to create assemblages. This method is popular in contemporary sculpture.
The material you choose should align with your concept, the type of sculpture you’re making, and your experience with the medium. For beginners, clay and plaster are often recommended, as they are easier to work with than stone or metal.
4. Prepare Your Workspace
Before you start sculpting, it’s essential to set up a clean, well-lit, and safe workspace. Sculpting can be messy, especially when using clay, plaster, or wood, so ensure you have enough room for your materials and tools.
Here’s what you need to consider for your workspace:
Surface: A sturdy table or workbench is important, especially when working with heavy materials like stone or wood.
Tools: Gather the necessary tools for your chosen material. For example, if you’re working with clay, you may need modeling tools, wire, or a rolling pin. If you’re using wood, ensure you have chisels, hammers, and sandpaper.
Safety: For certain materials like stone and metal, safety precautions are necessary. Always wear protective gear such as goggles, gloves, and a dust mask. Ensure proper ventilation if you’re working with chemicals or fumes.
Having a designated space to sculpt allows you to focus on your work without distractions.
5. Start the Sculpting Process
With your concept, materials, and workspace ready, it’s time to begin the sculpting process. Depending on your chosen technique, the process will vary, but here are some general tips:
Additive Sculpting (Building Up)
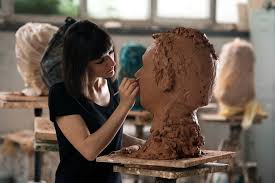
Start with a base: Begin by building up your material. If you’re working with clay, you can start with a wire armature (a skeleton structure) to support the sculpture as you add layers of clay.
Work in stages: Add small amounts of material at a time, gradually building up the shape. Sculpt the form in sections, focusing on the larger aspects first before refining smaller details.
Smooth and refine: Use tools to smooth out rough surfaces and add details, such as facial features, texture, or clothing folds.
Drying or firing: If you’re using clay, you will need to let your sculpture dry before firing it in a kiln, depending on the type of clay you’re using.
Subtractive Sculpting (Carving)
Start with a block: Whether you’re using wood, stone, or another material, begin by cutting away the excess material. Start with a rough shape and gradually refine the figure.
Work from general to specific: Focus on the general form first, removing large chunks of material, and then move on to fine details.
Be patient: Subtractive sculpture can be a slow process. Pay attention to texture, proportions, and balance as you carve.
6. Refining Your Sculpture
Once the basic form is created, it’s time to refine the sculpture. This involves adding intricate details, smoothing the surface, and perfecting the proportions.
Texture: Add texture to the surface if it’s required for your sculpture. You can create rough textures (like the appearance of hair or rough stone) or smooth textures (like polished skin or fabric).
Details: Focus on fine details like facial features, hands, and other small parts of the sculpture. These should be proportionate and balanced.
Proportions: Constantly assess the proportions of your sculpture. For example, in a human figure, the size of the head, limbs, and torso must be accurate to look realistic.
7. Casting or Molding (Optional)
If you wish to create a duplicate of your sculpture, casting or molding is an option. This process allows you to replicate your sculpture in a different material, such as bronze, resin, or plaster.
To cast your sculpture, you’ll need to:
Make a mold: Use a material like silicone or plaster to create a mold of the sculpture.
Prepare the casting material: Once the mold is ready, you can pour a casting material, such as bronze, into the mold. This will solidify into a replica of your sculpture.
Finish the cast: After the cast has cooled and hardened, remove it from the mold. You may need to clean it, refine details, and add a patina to enhance its appearance.
8. Final Touches and Finishing
The last step in creating a sculptural artwork is applying the finishing touches. This could involve polishing the sculpture, adding paint, or giving it a protective coating.
Polish: If your sculpture is made of materials like marble, stone, or metal, you may want to polish it to achieve a smooth, shiny finish.
Paint or patina: Depending on your vision, you can paint your sculpture or apply a patina to give it a specific color or texture. Patinas are often used on metal sculptures to create an aged or weathered effect.
Sealant: Some sculptures, especially those made of clay or plaster, require a sealant to protect them from damage and preserve their appearance.
9. Display and Enjoy
Once your sculpture is complete, it’s time to display it. Choose a location where the artwork can be appreciated from multiple angles. The lighting and background should complement the sculpture and bring out its best features.
Conclusion
Creating a sculptural artwork is a journey of creativity and patience. From the initial idea to the final touches, the process involves thoughtful planning, skilled craftsmanship, and a connection to the materials you work with. By following these steps and practicing regularly, you can develop your skills and create powerful, meaningful sculptures that communicate your unique artistic vision.
Last Update: April 25, 2025